 a journal of interesting technical ideas . . . a journal of interesting technical ideas . . .
Cisco devices have long had the Cisco Discovery Protocol (CDP). CDP is a data link layer advertisement that is periodically broadcast (every 30 seconds). Devices can listen and build a list of directly attached “neighbors” that includes critical information like the name, IP, type of device, and the port attached. Other vendors developed their own protocols, including Nortel, Foundry, and Microsoft. This information can be useful, either to familiarize yourself with a network or to communicate network information between systems.
PCs don’t typically support CDP, but you can do get some of this information by looking at the ARP table. All network communication takes place at layer 2. When a device wants to communicate with another local device and only knows it’s IP, it uses the Address Resolution Protocol to send a data-link layer broadcast asking “Who’s using this IP?”. The response is a MAC address. This is easy to see using Wireshark, especially if you can place your network card in promiscuous mode, so if you’re unfamiliar with the process take a look!
We can inspect the ARP table to see a list of other local systems on our network. There are three problems with this - first, the arp command is slow. Second, this will only show things that have communicated with your PC recently. You can use some type of broadcast to try to goose other devices to identify themselves (i.e. ping 192.168.0.255). Third, the devices only identify their layer 2 and 3 addresses so we don’t know much about them. The command below shows the arp command on Linux, but parallel commands are available in every operating system and network device.
pop > pop-os > ~ > $ >  __arp__
Address              HWtype    HWaddress    Flags Mask             Iface
_gateway             ether    0c:8d:db:8f:60:c0   C      enp0s31f6
192.168.25.50        ether    00:0c:29:19:61:6d     C      enp0s31f6
vcenter.stewart.tc   ether    0c:ee:99:81:23:03   C      enp0s31f6
192.168.25.5         ether    00:0c:29:9d:a2:38   C      enp0s31f6
192.168.25.4         ether    96:ee:a6:5d:30:ec   C      enp0s31f6
A slightly more useful command for discovering devices on the local network is ip neigh. This gives the same information but is much more responsive. It still depends on the target having been in communication recently.
pop > pop-os > ~ > $ > __ip neigh__
192.168.25.1 dev enp0s31f6 lladdr 0c:8d:db:8f:60:c0 REACHABLE
192.168.25.50 dev enp0s31f6 lladdr 00:0c:29:19:61:6d STALE
192.168.25.3 dev enp0s31f6 lladdr 0c:ee:99:80:00:03 REACHABLE
192.168.25.5 dev enp0s31f6 lladdr 00:0c:29:9d:a2:38 STALE
192.168.25.4 dev enp0s31f6 lladdr 96:ee:a6:5d:30:ec REACHABLE
You could achieve something similar with nmap as well. Running a command like nmap 192.168.0.0/24 will identify all the devices that respond locally and which ports are open on each of them, but it’s not happening automatically. NMAP takes a while to run, which makes it less practical, plus it will raise alarms if your network is monitored to any extent.
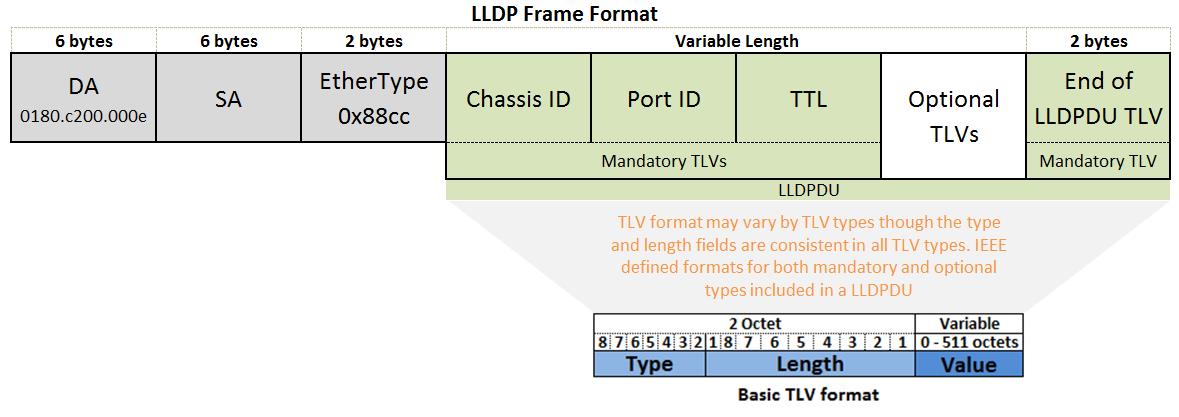 Link Layer Discovery Protocol is a vendor-neutral version of the CDP concept. Like CDP, LLDP advertises identity and capabilities. It can be used to communicate Power over Ethernet capabilities or requirements as well as device location. Information gathered by LLDP is stored in the SNMP device management information Base (MIB) and can be queried using SNMP tools. Most networking equipment either runs LLDP or allows it to be used.
LLDP can be enabled for Ubuntu derived Linux servers using the lldpd package. It uses snmpd, so install that at the same time.
sudo apt install lldpd snmpd
sudo service lldpd status start
sudo service snmpd status start
lldpcli
Once installed, use the lldpcli command to enter an LLDP command line interface. From the prompt, type show neighbors to list the discovered devices. In this example, I can see that I’m connected to a Cisco Meraki switch on port 6. LLDP can also be enabled with the -c flag to produce CDP packets.
[lldpcli] $ __show neighbors__
\-------------------------------------------------------------------------------
LLDP neighbors:
\-------------------------------------------------------------------------------
Interface:  enp0s31f6, via: LLDP, RID: 1, Time: 0 day, 01:50:10
Chassis:
 ChassisID:  mac 0c:8d:db:80:72:3e
 SysName:    MS220-Switch
SysDescr:   Meraki MS220-8P Cloud Managed PoE Switch
MgmtIP:     192.168.26.3
Capability: Bridge, on
Port:
  PortID:      ifalias 6
  PortDescr:   Port 6
  TTL:         120
Unknown TLVs:
  TLV:         OUI: 00,18,0A, SubType: 1, Len: 4 00,F6,40,25
\-------------------------------------------------------------------------------
“Why” is always a useful question - I’ve always found that people who understand something embrace the opportunity it presents.
So, why bother with LLDP? It’s really going to be most useful to network support people. Putting this on my laptop allows me to quickly get my bearings on a network as I relocate. I can identify the port I’m attached to either from the PC or from the switch side. It may sound mundane, but just understanding the port is a lot easier than tracing cables! Pentesters can use it for reconoitering. As always, use your power for good!