 a journal of interesting technical ideas . . . a journal of interesting technical ideas . . .
![]() In Updating a GNS3 Appliance File I described editing a GNS3a file to update an appliance. That is the method I’ve used for a long time for updating and for creating new appliances, but the GNS3 team has included a Python program to walk you through the process of creating a new appliance and I thought it would be interesting to give it a try. I decided to create an appliance for the Raspberry Pi Desktop distribution.
In Updating a GNS3 Appliance File I described editing a GNS3a file to update an appliance. That is the method I’ve used for a long time for updating and for creating new appliances, but the GNS3 team has included a Python program to walk you through the process of creating a new appliance and I thought it would be interesting to give it a try. I decided to create an appliance for the Raspberry Pi Desktop distribution.
I was listening to the most recent Linux Unplugged, and they were doing interesting networking using a Pi to connect two different 4G providers. Their setup allowed choosing an active path based on throughput or errors, or for balancing between multiple paths. The discussion touched on multi-link, policy-based routing, using Linux routing. It sounded like something I’d like to experiment with! I’ve linked to the show in the references. In addition, Raspian is a prettty good “light” desktop for testing in GNS3 and a lot of folks use it with their Pis, so I thought this would be an interesting appliance.
To begin, assuming you haven’t done so already, you’ll need to clone the gns3-registry repository from GitHub.
git clone https://github.com/GNS3/gns3-registry.git
If you’ve already cloned it, make sure that your branch is up to date. Upstream is the original source (in this case the GNS3 copy).
git fetch upstream

There’s a Python program included in the repository that acts as a “wizard” in guiding you through the appliance creation process. Invoke it by running new_appliance.py. I’ve copied the flow below, and I’ll interrupt the output occasionally to comment on the process.
The first few questions are pretty straightforward. I copied the description from the Raspberry Pi Foundation website.
brent@MintyTwenty:~/git/gns3-registry$ python3 new_appliance.py
Appliance id (example: cisco-asav): Raspian
Appliance name: Raspian
Category of the appliance
 1) router
 2) multilayer_switch
 3) firewall
 4) guest
 : __4__
Description of the appliance. Could be a marketing description: __Raspberry Pi Desktop comes pre-installed with plenty of software for education, programming and general use; including Python, Scratch, Sonic Pi, Java, and more.    Appliance created to demonstrate new_appliance.py - read more at https://nextpertise.net.
Name of the vendor: Raspberry Pi Foundation
Website of the vendor: https://www.raspberrypi.org
An optional documentation for using the appliance on vendor website(optional leave blank for skip) :
Product name: Raspberry Pi Desktop
An optional product url on vendor website(optional leave blank for skip) : __https://www.raspberrypi.org/downloads/raspberry-pi-desktop__
Version of the registry compatible with this appliance
1) 1
2) 2
3) 3
4) 4
5) 5
: 5
Document if the appliance is working or not
1) stable
2) experimental
3) broken
: 1
The Raspberry Pi Desktop is open source, so it’s available for free. I’ve removed my email address from the blog, to prevent spam via scrapping.
About image availability: can be downloaded directly; download requires a free registration; paid but a trial version (time or feature limited) is available; not available publicly
 1) free
 2) with-registration
 3) free-to-try
 4) service-contract
(optional leave blank for skip) : 1
Maintainer name: Brent Stewart
Maintainer email: X@X
The next section starts by asking how to use the appliance. This would be a place to reference built-in credentials or processes that should be used. Note also that I’m specifying a custom symbol. I took the Raspberry symbol and used Gimp to crop the image and scale it to 63px tall (GNS3 asks for symbols to be less than 70px). GNS3 asks for an SVG, but Gimp only exports as PNG so that’s what I’m using.
How to use the appliance(optional leave blank for skip) :  Default password is raspberry
An optional symbol for the appliance(optional leave blank for skip) : rpi.png
The script then prompts for the networking interface names. If you are not sure, leave this blank. Examples of different naming schemes including Cisco (gigabit1/1), Linux (enp6s0), and JunOS (4/0/0). It also asks for the type of card. I had success using virtio, which is the paravirtualized adapter using by Qemu.
Optional name of the first networking port example: eth0(optional leave blank for skip) :
Optional formating of the networking port example: eth{0}(optional leave blank for skip) :
Optional port segment size. A port segment is a block of port. For example Ethernet0/0 Ethernet0/1 is the module 0 with a port segment size of 2(optional leave blank for skip) :
Type of network adapter
1) e1000
2) i82550
3) i82551
4) i82557a
5) i82557b
6) i82557c
7) i82558a
8) i82558b
9) i82559a
10) i82559b
11) i82559c
12) i82559er
13) i82562
14) i82801
15) ne2k_pci
16) pcnet
17) rtl8139
18) virtio
19) virtio-net-pci
20) vmxnet3
: __18__
Number of adapters: 1
The system prompts for RAM allocation, CPU, and disks. I set the RAM to 1GB to minimize memory usage on my test system, but my testing indicated that you’ll be more comfortable if you can bump this up. Leave the number of CPUs as the default. Select SATA as the HDA image and do not specify any other drives. This confused me the first time, since it loops through the same questions four times without queueing you about what it’s doing. Finally, notice that I’m emulating an Intel core since I grabbed the Intel RPi image. You could use the ARM image, but I didn’t see the value at this point.
Ram allocated to the appliance (MB): __1024__
Number of Virtual CPU(optional leave blank for skip) :
Disk interface for the installed hda_disk_image
1) ide
2) scsi
3) sd
4) mtd
5) floppy
6) pflash
7) virtio
8) sata
(optional leave blank for skip) : __8__
Disk interface for the installed hdb_disk_image
1) ide
2) scsi
3) sd
4) mtd
5) floppy
6) pflash
7) virtio
8) sata
(optional leave blank for skip) :
Disk interface for the installed hdc_disk_image
1) ide
2) scsi
3) sd
4) mtd
5) floppy
6) pflash
7) virtio
8) sata
(optional leave blank for skip) :
Disk interface for the installed hdd_disk_image
1) ide
2) scsi
3) sd
4) mtd
5) floppy
6) pflash
7) virtio
8) sata
(optional leave blank for skip) :
Architecture emulated
 1) aarch64
 2) alpha
 3) arm
 4) cris
 5) i386
 6) lm32
 7) m68k
 8) microblaze
 9) microblazeel
10) mips
11) mips64
12) mips64el
13) mipsel
14) moxie
15) or32
16) ppc
17) ppc64
18) ppcemb
19) s390x
20) sh4
21) sh4eb
22) sparc
23) sparc64
24) tricore
25) unicore32
26) x86_64
27) xtensa
28) xtensaeb
: 26
The system will prompt for the console - set this to VNC.
Type of console connection for the administration of the appliance
 1) telnet
 2) vnc
 3) spice
: 2
I left the boot priority alone. I didn’t enable KVM within KVM :) and didn’t change process priority.
Optional define the disk boot priory. Refer to -boot option in qemu manual for more details.
 1) d
 2) c
 3) dc
 4) cd
 5) n
 6) nc
 7) nd
 8) cn
 9) dn
(optional leave blank for skip) :
Command line parameters send to the kernel(optional leave blank for skip) :
KVM requirements
 1) require
 2) allow
 3) disable
: 3
Optional additional qemu command line options(optional leave blank for skip) :
Process priority for QEMU
 1) realtime
 2) very high
 3) high
 4) normal
 5) low
 6) very low
 7) null
(optional leave blank for skip) :
Finally the script gets to images. I added two images - the blank drive that the GNS3 project posted to SourceForge and the Rpi image I downloaded earlier. In both cases, checksum can be obtained with the md5sum command on Linux and the file size found with ls -l. This image isn’t encrypted or compressed, so that was left blank.
Add image?[y/n]: y
Filename: 2020-02-12-rpd-x86-buster.iso
Version of the file: 2020-02-12
md5sum of the file: 98f34fb53086752b4c9c452094f30740
File size in bytes: 3128147968
Download url where you can download the appliance from a browser(optional leave blank for skip) : https://www.raspberrypi.org/downloads/raspberry-pi-desktop/
Optional. Non authenticated url to the image file where you can download the image.(optional leave blank for skip) :
Optional, compression type of direct download url image.
 1) bzip2
 2) gzip
 3) lzma
 4) xz
 5) rar
 6) zip
 7) 7z
(optional leave blank for skip) :
Add image?[y/n]: y
Filename: empty8G.qcow2
Version of the file: 1
md5sum of the file: f1d2c25b6990f99bd05b433ab603bdb4
File size in bytes: 197120
Download url where you can download the appliance from a browser(optional leave blank for skip) :   https://sourceforge.net/projects/gns-3/files/Empty%20Qemu%20disk/empty8G.qcow2/download
Optional. Non authenticated url to the image file where you can download the image.(optional leave  blank for skip) :
Optional, compression type of direct download url image.
 1) bzip2
 2) gzip
 3) lzma
 4) xz
 5) rar
 6) zip
 7) 7z
(optional leave blank for skip) :
Add image?[y/n]: n
Last, it prompts you to setup a version that links the hardware and the images together to form a group. I’ve only built one version at this point. Again, the script cycles through prompting you for images, so be prepared for this and understand that you only need the HDA and CD-ROM devices in this scenario.
Add appliance version?[y/n]: y
Appliance version name: 2020-02-12
Image for hda_disk_image
 1) 2020-02-12-rpd-x86-buster.iso
 2) empty8G.qcow2
(optional leave blank for skip) : 2
Image for hdb_disk_image
 1) 2020-02-12-rpd-x86-buster.iso
 2) empty8G.qcow2
(optional leave blank for skip) :
Image for hdc_disk_image
 1) 2020-02-12-rpd-x86-buster.iso
 2) empty8G.qcow2
(optional leave blank for skip) :
Image for hdd_disk_image
 1) 2020-02-12-rpd-x86-buster.iso
 2) empty8G.qcow2
(optional leave blank for skip) :
Image for cdrom_image
 1) 2020-02-12-rpd-x86-buster.iso
 2) empty8G.qcow2
(optional leave blank for skip) : 1
Image for initrd_image
 1) 2020-02-12-rpd-x86-buster.iso
 2) empty8G.qcow2
(optional leave blank for skip) :
Image for kernel_image
 1) 2020-02-12-rpd-x86-buster.iso
 2) empty8G.qcow2
(optional leave blank for skip) :
Add appliance version?[y/n]: n
I created a Raspberry Pi Desktop image, but assuming you’ve created a new appliance and want to share it you’ll need to submit your new file as a pull request. If you haven’t already cloned the GNS3 Registry Git, refer back to the beginning of the article for instructions on that part. Make sure your local copy is up-to-date. Two Python programs are included in the repo. Run them both on your copy before continuing. These are QA processes that look for issues before you submit. They will take a little time to run.
pip3 install -r requirements.txt   # this does __pip3 install jsonschma__ and __pip3 install pycurl__
python3 check.py
python3 check_url.py
Next push your local copy to your github copy. In Github terms, origin is your copy on Github, and master is the local copy.
git add .
git commit -m "Added Raspberry Pi Desktop appliance"
git push -f origin master
Now there is an up-to-date local copy of the gns3-registry that includes the updated gns3a appliance and your fork is up-to-date on Github. Next, offer the update to the project via a Pull Request.
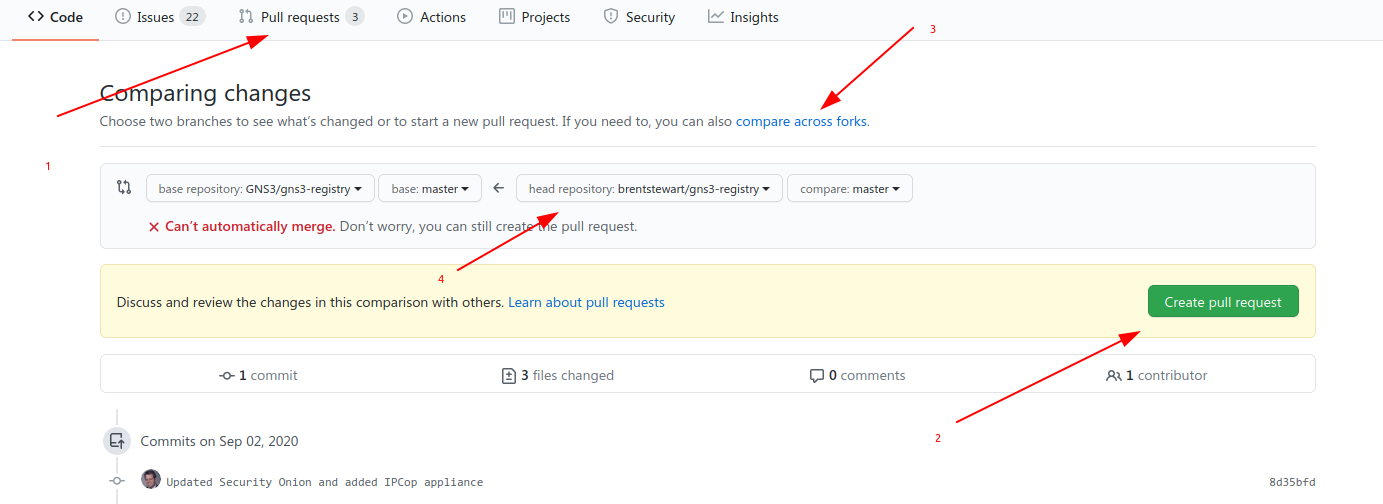 Go to the gns3-registry repository on Github and select the Pull Requests tab and click the big green New pull request button. Under Compare, select the link to compare across forks (since your copy is a fork) and select your fork. It should show you the changes to files so take a moment to digest that and make sure this PR is doing what you want. Finally, submit the Pull Request. Github will email you when there’s an update to the request. If the GNS3 team has a question, they’ll submit a comment on the PR and leave it open for you to resolve. Otherwise, it will get merged in and all the other GNS3 users will be able to enjoy your hard work!
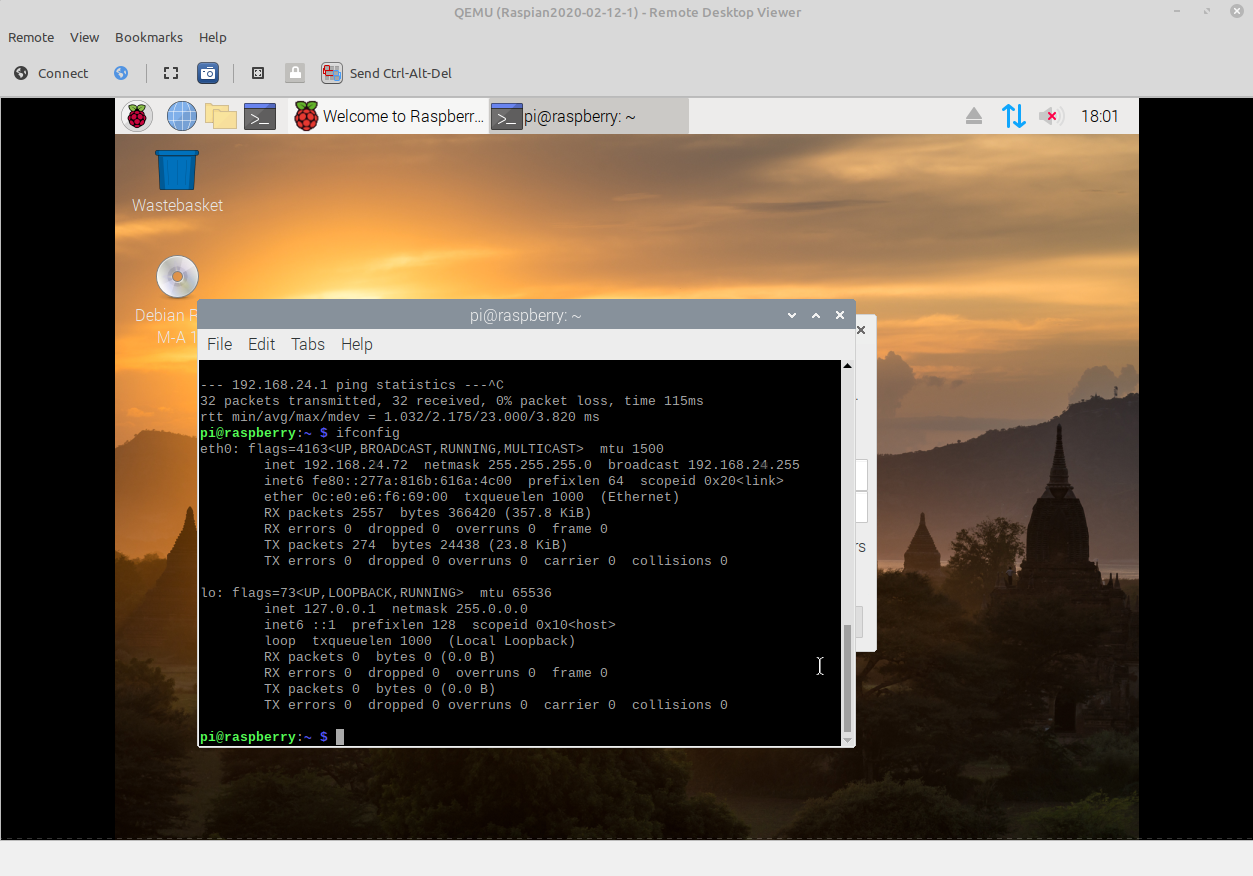
The image seems to run well. If I test the Linux Unplugged scenario, I can add some additional interfaces to it easily. I’ll probably also add some RAM to liven it up. If you use this image, it boots into an install screen. You can use the ISO image with persistence, or you can install. Be aware that the install process took awhile.
The focus of the article was on using the included new_appliance.py script to build new appliances. In the past, I’ve just used an existing template and updated it manually for a new appliance. I found the script interesting, but it took several run-throughs to understand the flow and to get things setup the way I wanted. For me, it’s easier just to crank up nano and hand edit but the Python program wasn’t bad and would be particularly useful to someone who wasn’t as familiar with the process. Hopefully this walk through will help that person understand what to expect and make using the tool a little easier.
Do you have any custom appliances? Contributing to an open source project was really cool and I’d love for you to have the chance to experience it! Are there some appliances you wish we could build for GNS3? Write in the comments below, and maybe I can help you build it. I’d love to hear how you use this feature!