 a journal of interesting technical ideas . . . a journal of interesting technical ideas . . .
PVE is a hypervisor that supports LXC containers and full virtual machines. It’s comparable to VMWare ESXi. The comparison fits across the board. There’s a Proxmox DataCenter Manager that’s similar to VMWare Cloud Director (VCD), and it supports a similar set of features such as high availability failover.
The current version is 9 (as of 10/25), but my experience has been poor when attempting to upgrade. As a result I recommend v8 for the time being. I also recommend running Proxmox Backup - the closest VMWare comparable might be Zerto.
I’ve been using PVE for a several years and I’ve been pretty pleased with it. I run a virtualization server at home for a few reasons. VMs have been a way to break apps out into seperate environments, making self-hosting easier. Second, I support virtual environments and wanted to use my home network to get hands-on time.
Originally, I used a free version of VMWare but VMWare was purchased by Broadcom. They halted the free version for a while and haven’t proven to be transparent in their approach to licensing, plus the server hardware I was using died, so it made sense to explore alternatives. Proxmox VE had a lot of the capabilities, plus the Linux underpinnings were much more obvious (which supported another direction I was heading). The PVE environment has been mostly good and I’ve never had an issue that I couldn’t recover from (similar to what you’d expect running ESXi).
Post-install
bash -c "$(wget -qLO - https://github.com/community-scripts/ProxmoxVE/raw/main/misc/post-pve-install.sh)"kernel clean
bash -c "$(wget -qLO - https://github.com/community-scripts/ProxmoxVE/raw/main/misc/kernel-clean.sh)"
BassT23 Updater
bash -c "$(curl -s https://raw.githubusercontent.com/BassT23/Proxmox/master/install.sh)Host Backup
bash -c "$(wget -qLO - https://github.com/community-scripts/ProxmoxVE/raw/main/misc/host-backup.sh)"CPU Governor
Allows selection of CPU scaling governor. In Enterprise settings, moving to “performance” will give more consistent results. In homelabs, use powersave or schedutil (adjusts dynamically with demand).
bash -c "$(wget -qLO - https://github.com/tteck/Proxmox/raw/main/misc/scaling-governor.sh)"
There’s a community that creates scripts to build VMs and LXCs to enable easy setup of popular applications. The scripts cover popular applications including Pi-Hole, Homeassistant, and Homarr. At last check, there were almost 400 supported applications!
Use caution here because the scripts are presented as easy “pipe to bash” commands that should be run from PVE root. The scripts can be downloaded and reviewed or just viewed on Github. Before running a foreign script on your server, it would be advisable to review the script!
Here are some basic command line notes for working with PVE.
Version
pveversion
Node Status
pvesh get /nodes/<id>/status
Cluster Status
pvecm status|nodes|quorum
corosync-cmapctl
Join a cluster
pvecm add|delnode <ip|hostname>
Change the quorum number
pvecm expected <count>
Network specifics are configured in /etc/network/interfaces. Details about the environment can be seen from the command line.
What the IP?
ip a
List bridges
brctl show
List FW rules
iptables -L -n
Managing VMs from the command line can be a good deal easier than using the gui. I’ve found it’s convenient to have a default Ubuntu server ready and turned off. This can then be cloned and configured.
List VMs
qm list
Interacting with VMs
qm start|stop|shutdown|destroy <id>
Create a VM
qm create <id> --name <name> --memory <size> --net0 <virtio|bridge=vmbrX> --cores <#> --sockets <#> --virtio0 local:<storage>:<size>
Clone a VM
qm clone <source-id> <new-id> --name <name>
Interacting with Snapshots
qm snapshot|rollback <id> <snapshot-name>
Interacting with Backup
vzdump <id> --compress <type> --storage<id>
vzrestore <file> <id>
List storage
pvesh get/storage
List Storage details
pvesh get/storage/<id>
Create
pvesh create /storage --storage <id> --type <type> --content <type> --path <path>
Delete
pvesh delete /storage/<id>
Change datastore password - I used this once because I changed the root password for PBS. That password was used to map a datastore into PVE, where it was no longer accessible. This allowed the map settings to be updated.
root@pve2:~# pvesm set backup --password
Enter Password: *******
Proxmox allows the administrator to attach to a VM using lxc-attach. The session is logged in as root.
lxc-attach -n <id>
This is extremely useful - for instance, it could be used to reset a lost administrator password using the passwd command!
PBS has saved my bacon several times. It’s a “must” when running PVE because it’s an easy way to backup VMs.
Follow a 3-2-1 strategy for backups - at least 3 copies, at least two media types, at least one offline. The original data is the first copy and PBS is the second as long as the PBS VM sits on a seperate server. I recommend Backblaze as a third offsite copy.
You should absolutely review the files that are being backed up to make sure that they include all of the correct files.
It’s also a rule, call it Brent’s Law of DR, that untested disaster recovery never works. You should do a test restore periodically. This might be restoring just a sample file, or restoring an entire VM. Testing the restore process ensures both that the backup is really working and that you remember the steps necessary to invoke a restore.
Setting up PBS is about as difficult as setting up PVE. If you did the one, the other will not be a problem. The documentation is good, but takes some time to read so here’s a quick walkthrough of the actions you’ll need to take.
Setup Pruning to keep the latest backups. This setup mostly comes down to the crossing point of your budget, paranoia, and available space. You can specify the number of backups to keep over various timeframes, such as days, weeks, months, and years. I backup weekly and want to keep a couple backups, but I also keep monthlys as well in case I realize later that I need a restore.
Get the “fingerprint” using the big “show Fingerprint” button on the dashboard.
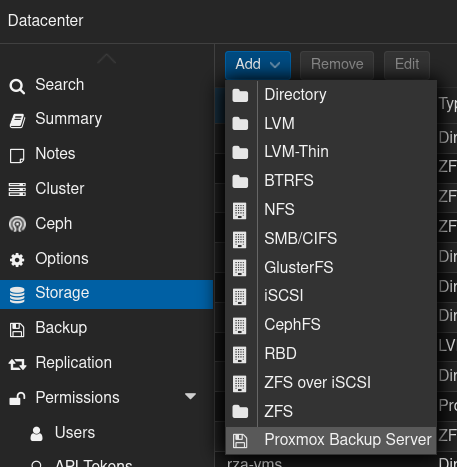
Back in the PVE environment, go to the server view and select DataCenter > Storage.
Click Add and choose Proxmox Backup Server from the drop-down menu.
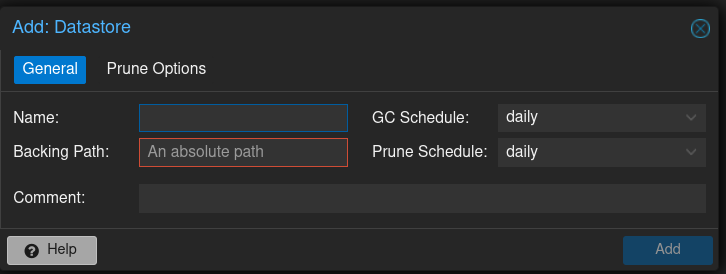
Give the backup server an ID and enter in it’s IP address. Use root@pam as the username, the password you set on PBS and then supply the datastore setup in Step 3 above. Here’s where you’ll need to paste in the fingerprint from PBS. This is also the place where you can fiddle with retention and encryption if needed.
The simple way to backup a VM at this point is just to select a VM and choose “Backup”. No one remembers to do backups though, so the key is to have them happen automatically.
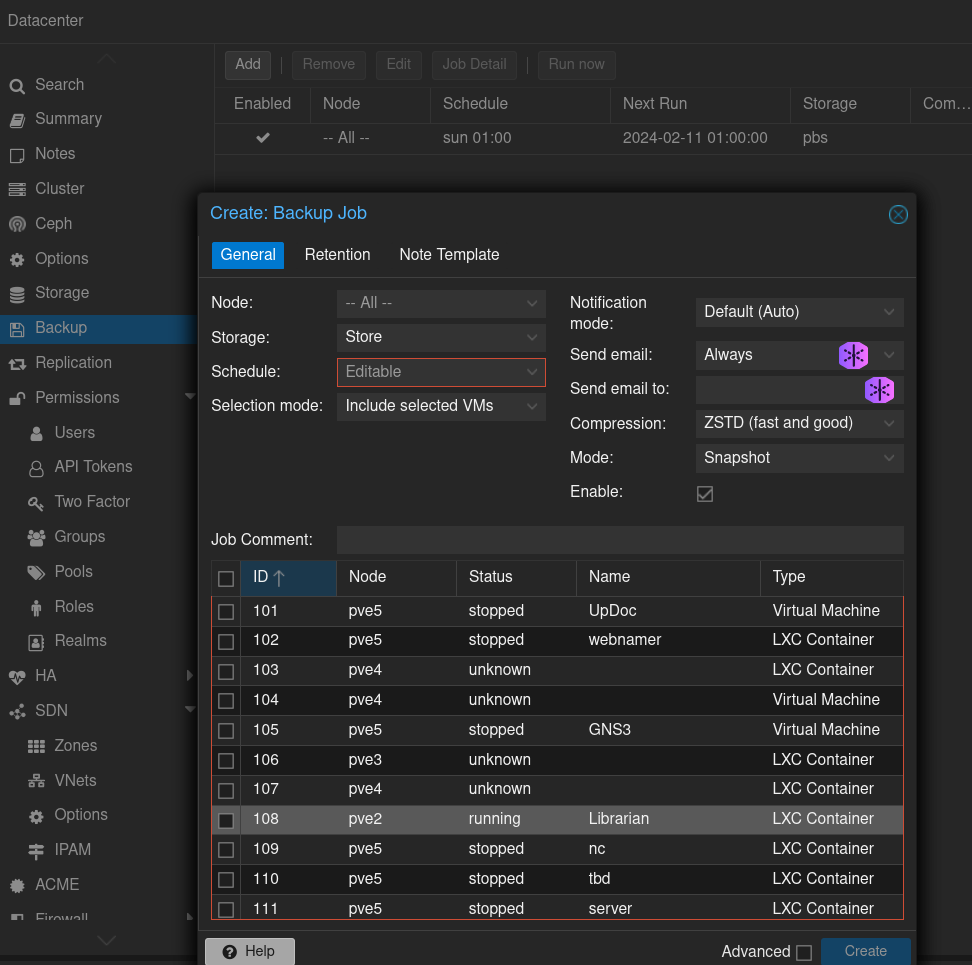
Still under Datacenter, choose backup and Add.
To backup all VMs from all PVE instances weekly, use the following settings:
At this point, weekly backups should start flowing in. PBS will deduplicate and make very efficient use of space, so even a 4TB backup drive has been fine for me.
Restores are conducted from the PVE admin screen (http://your-pve-server:8006).
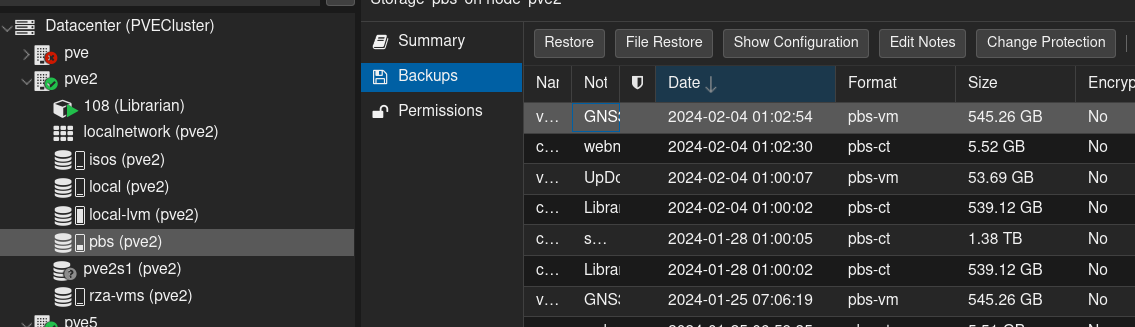
Under the Server View Datacenter heading, go to the target server and select the Proxmox Backup Server storage. Mine is called pbs in the screenshot. Because it’s attached to the datacenter, that storage shows up under every server. It’s the same thing, so for file recovery just pick a server to work through.
Pick the backup that has the file you’d like to restore. Depending on the backup policy you specified, there will be several copies over a period of time. If you’re restoring because you borked the config last week, for instance, you may need to go back two weeks to find a working copy.
Once you’ve found your target, select File Restore. I know, kind of obvious.
This opens a file viewer that lets you burrow into directories to find your file. Once selected, choose the Download button to get the file.
Under the Server View Datacenter heading, go to the target server and select the Proxmox Backup Server storage. Mine is called pbs in the screenshot. Because it’s attached to the datacenter, that storage shows up under every server and so I’m selecting the one under the server that I want to restore to.
Pick the backup you’d like to restore. Again, there will probably be several copies.
Once you’ve found your target, select Restore.
When you restore, you can select the target PVE instance, the storage on that PVE you want to use, and the VM ID.
You can restore it to the existing server, using the existing VM ID, and overwrite the current copy. You can also choose to restore it to a different ID so that there’s a second copy. That could be useful if you’re trying to clone a setup.
The process of setting this up isn’t too confusing. I find the Proxmox interface takes a little time to develop an intuitive feel, but it’s consistent and mades sense.