 a journal of interesting technical ideas . . . a journal of interesting technical ideas . . .
Work uses Windows, but I need a Linux workstation with that set of tools. I find WSL2 incomplete . . . partly because my personal workflow is Linux based. I spoke with the Windows expert and we agreed to use VMWare Workstation to deploy my Windows environment alongside my Linux system. Deploying the standard Windows image to a remote VMWare environment wasn’t something we had setup already. Since I’m trying to be a special case, he sent me the WIM file to figure out how to deploy.
A WIM is a file-based Windows Image that is made to be easy to test and deploy. It’s kind of like a ZIP, to my understanding, in that it captures all the files and the directory structure of a partition in a file. Being file-based makes it easy to modify (more on this later). Because it’s not a sector-by-sector image you can deploy it to different sized drives.
 I tried several approaches to using the WIM file. I’ll mention them briefly here so that you can learn from my experience.
The first thing I tried was making a Windows VM using the Windows 10 downloadable disk image from Microsoft. Once booted, I added a drive and expanded the WIM to the new drive. I deleted my drive with generic Windows and rebooted. I think this didn’t work because the new disk wasn’t set as a primary partition. This approach may be doable, but I moved on pretty quickly.
The next thing I tried was to deploy it via netboot using a Fog Server. That project is pretty stinking cool! I was able to get a VM to reference the server for boot information. The problem here was that I didn’t know what it was looking for (first time with PXE). When I decided it wanted an ISO, I thought “if I knew how to convert to the WIM to an ISO, I could just boot that directly in the VM!” and abandoned the Fog Server approach. I may come back to this to learn more about PXE booting.
Microsoft has a series of articles that you’ll need to read to understand how to do this. I’ve referenced them, but be warned that they reference each other circlically and there’s not a good starting point. To help you, I’m going to attempt to draw a straight line through how I accomplished this.
You need to boot into a WinPE environment to deploy the WIM image. Windows PE is a small OS made to facilitate installation, used by Windows as a “pre-boot” environment. To build your WinPE boot disk, download the Windows Assessment and Deployment Kit on a Windows PC and install the ADK executable.
Start the Deployment and Imaging Tools Environment as an administrator and create a working set of files using the copype command.
copype amd64 C:\WinPE_amd64
The documentation says you can build an ISO now. Don’t! There are some batch files that will make this easier - download a zip from here and pull the scripts out and place them in the root of your WinPE directory. Also, grab the WIM file that you’re trying to deploy and stick that in the WinPE directory as well. Now you can build the ISO using the MakeWinMedia command.
MakeWinPEMedia /ISO C:\WinPE_amd64 C:\WinPE_amd64\Acme_Installer.iso
That should create an ISO that’s about a half-gig larger than the WIM file.

I created an empty VM with an empty hard drive. The critical piece here is that my image expects to be deployed to a TPM environment. TPM requires UEFI and that the VM be encrypted.
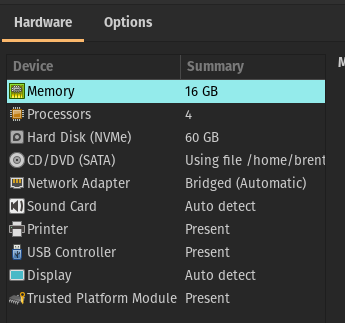 In VMWare Workstation, enable UEFI under Virtual Machine Settings: go to the Options tab, select Advanced, and set the Firmware type to UEFI and Enable Secure Boot. This is shown in the picture to the right. While at the Options tab, select Access Control, click the button to encrypt the virtual machine, and choose a password.
Next add the Trusted Platform Module. Add it under the Hardware tab by clicking the Add button at the left-bottom of the window.
Finally, we need the new VM to boot from the ISO we created earlier. Add the new WinPE ISO to the CD drive and make sure it’s marked connected.
Now we’re ready to install the WIM image! Boot the new VM using the WinPE boot disk. It will boot to a prompt. The procedure here is laid out by Microsoft. Use the scripts that you added to the boot disk to first help partition the drive and then to apply the image. CreatePartition-UEFI.txt and ApplyImage.bat were included in those scripts. Obviously image names will change.
diskpart /s CreatePartitions-UEFI.txt
D:\ApplyImage.bat D:\Images\ACME-Standard.wim
The ApplyImage batch file will ask a few questions you need to be prepared for. You can safely answer “no” to all of them.
From this point, the VM will go through a preliminary setup, doing things like setting the keyboard type. It will reboot, ask you to login, and then continue the higher level (Cortana led) part of setup. From here, everything should install as you would expect!
As an interesting side-note, the WinPE boot disk includes an FTP client. That might be useful script out some additional file copies to the new machine.