 a journal of interesting technical ideas . . . a journal of interesting technical ideas . . .
A good friend lost his father to COVID last week. It was unexpected - he was only about 60 and in good health. My friend asked for help putting together a memorial DVD. Perhaps you’ve seen these - at a receiving in the US it’s common these days to find a TV that displays a collection of pictures of the deceased, perhaps with some background music.
I don’t have any special expertise in Video and I didn’t have long to figure it out. If you’re in a similar situation then 1) leave a note in the comments and I’ll pray for your friends family and 2) here are some quick and dirty instructions that will let you be of service.
I received a collection of sixty photos, a few digital pictures, as well as some MP3 files that were some of his Dad’s favorites. I scanned all the pictures in as JPG at 300 dpi and put them in a directory with the MP3s. I used GIMP to crop the photos. I originally left the white borders around some pictures, but later found this created artifacts on the slideshow and re-edited to crop to just the picture. I found the obituary online for some of the details I would need for the title page.
sudo apt install gimp
This section isn’t a software recommendation. I wanted something that I could quickly understand and that wasn’t overly complicated to use. I tried a few video editors and quickly picked kdenlive. Even though I’m using Pop!OS Gnome, kdenlive worked fine.
sudo apt install kdenlive
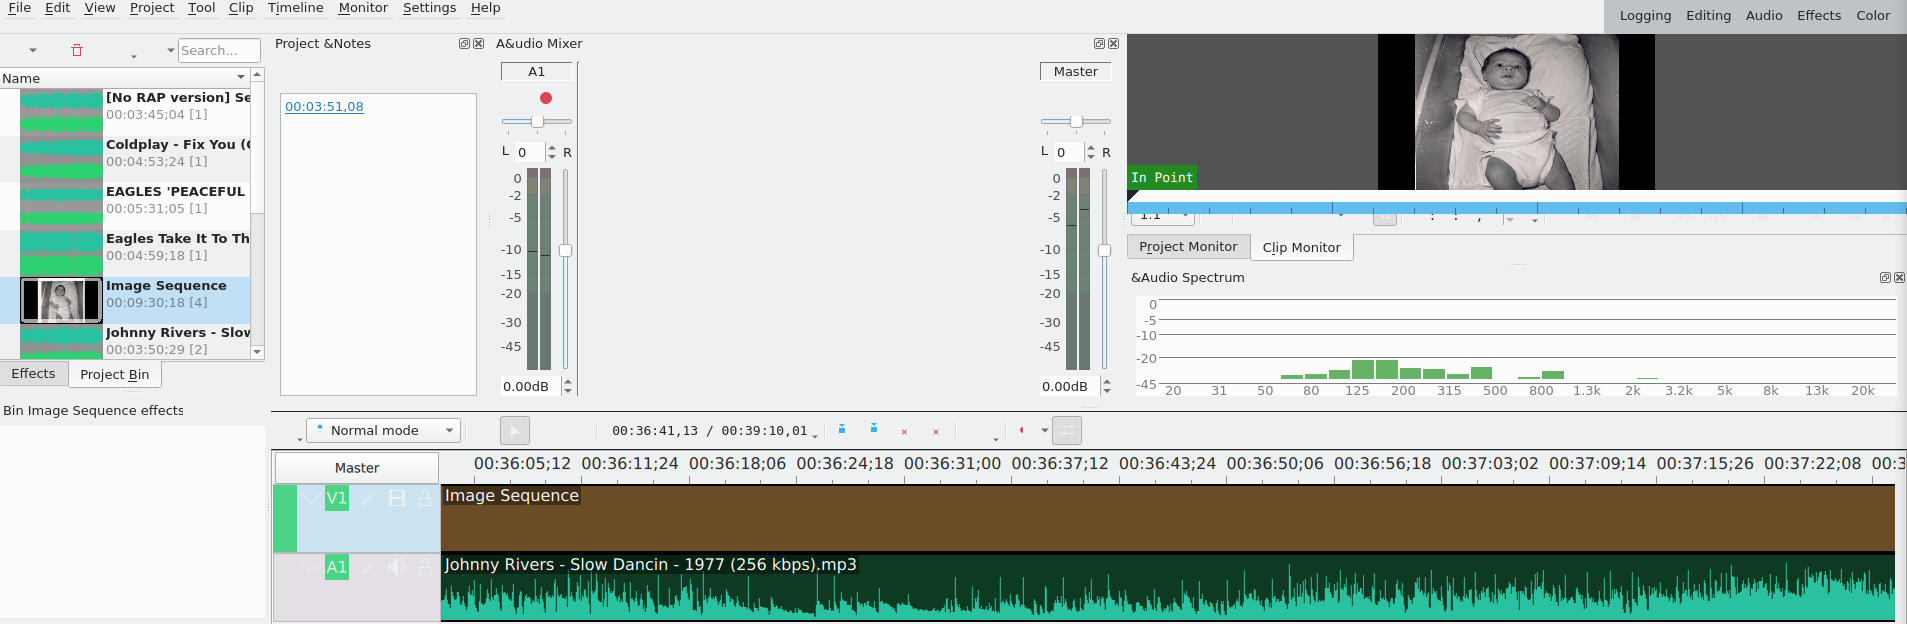
By default, kdenlive shows two video tracks and two audio tracks. I deleted the extra tracks. Right clicking in the resources box (below the file menu) allowed me to import the audio files and an image sequence. The image sequence importer allowed me to bring in a group of pictures in the same format from a single directory. The picture files I received were PNG, so I used GIMP to convert them and then imported the entire set of pictures from the working directory. The image sequence sorts by default to alphabetical order. I had been given the pictures in rough chronological order and numbered them as they scanned, so they were already in the right order and I didn’t have to spend a lot of time. I was lucky, but I definitely suggest that technique if you need to make this on short notice.
The image sequence import allows you to specify how long each picture displays as well. These DVDs are typically played in the background where they provide a distraction to folks in the receiving line and I wanted it to have enough tempo so it wouldn’t be boring. I decided to change photos every 10 seconds and this turned out to be well received.
I created a title by right clicking in the resource box and “adding title clip”. This gave me a PowerPoint-like interface where I could add some text. In this case, I created a simple title with the name, birth date and date of death. It also let me specify how long it would display.
Dragging the image sequence or the title onto the video track (“V1”) blocked off a period of time and labeled it “Image Sequence”. Sixty photos displayed for 10 seconds each gives ten minutes of video, so I dragged out a few more copies of the Image Sequence to fill out the DVD. I left a brief black screen between sequences, then a copy of the title to show the name of the deceased, before restarting the slide show.
Dragging the audio files onto the audio track (“A1”) was a similar process. I simply dragged enough songs to cover the time, leaving brief spaces between. I was able to watch the video and I paid special attention to the transitions to make sure they were clean and not distracting. I think kdenlive will handle fancy image transitions but I elected not to spend too much time on them. I had a day to put this together and the “plain vanilla” transitions were respectful and not distracting.
At this point you can go to Project > Render to compile the ensemble to an ISO file. Here I hit another problem - I don’t have a DVD burner! I have an old laptop running Linux, so I used SFTP to transfer the file to it and used brasero to burn the DVD.
sudo apt install brasero
Last step! I dug out an old DVD player to verify that the burned DVD would read okay. It did and the resulting display looked sharp and clean. I burned a copy for the funeral, and extras for my friend and his siblings.
This was a rush job by an stark amatuer, but the result was appreciated by the family. I want to the thank the folks at kdenlive - it’s a slick program, worked reliably, and was easy to pick up. The DVD I made probably was more of a credit to their hard work and gift to the community than to my contribution. That said, this is a doable project. I could see this idea being a nice feature at an anniversary or birthday party, or even at a company Christmas party. If you have the opportunity to be of service in this way, I hope this walk through will be a beneficial introduction.