 a journal of interesting technical ideas . . .
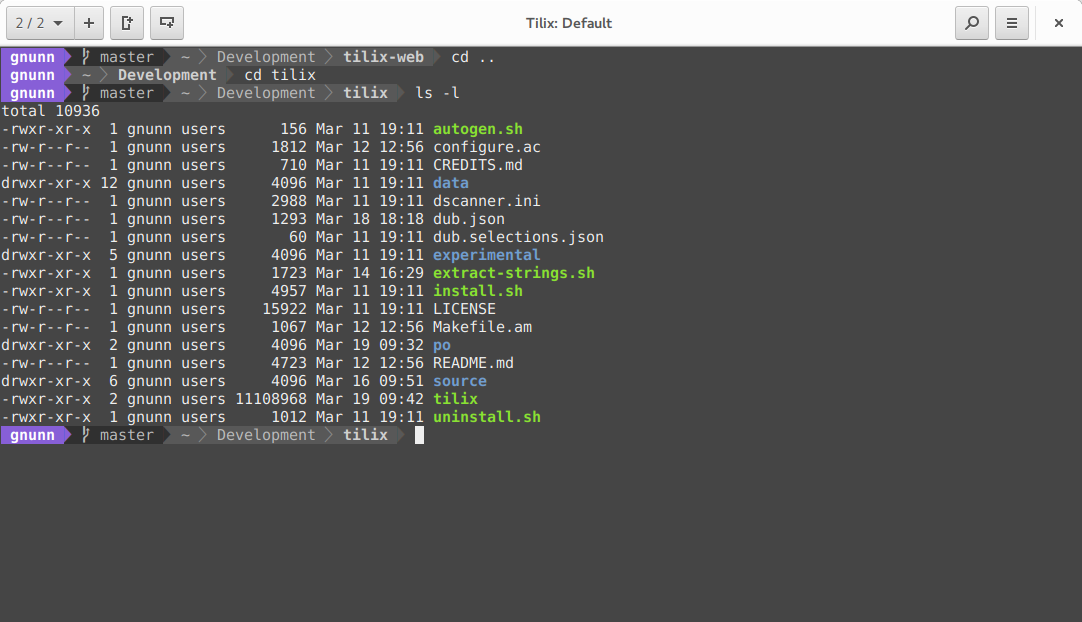
 Tilix is a terminal application for Linux that I recommend as a replacement for the stock program (like gnome-terminal) shipped with your distribution. This article will walk through some of the reasons I like Tilix and will show you how to use it with GNS3.
The basic pitch of Tilix is that it is a tiling terminal. New terminals exist in sessions. Within a session, terminals can split the window horizontally or veritcally.
Think of a session like a desktop. You could create a poor-man’s IDE by grouping three sessions on a desktop, with one showing a directory, a second running nano, and the third ready to receive a command. Another session could be used for networking, with terminals open to a firewall and switch. You manage sessions with the drop-down menu on the right.
Sessions can be divided up into terminals. New terminals split the screen. You create a new terminal using the “horizontal split” button or the “vertical split”.
There are a lot of additional features, such as a search function (particularly useful when scrolling through thousands of lines of syslog output), but the tiling features are what makes this program so darn useful to me. As I have moved to larger displays (I typically work on a 40" 4K display these days), managing windows is more of a chore and I prefer things that help organize the desktop.
Tilix supports any customization that a normal terminal application allows. I’ll dig a little into this aspect in a seperate article, but I’ve included links for some of the ways I make my terminal easy to read. I use the powerline-shell prompt. I use either JetBrains Mono font or Fira Mono, which both support programming ligatures. There’s a variety of other monospace fonts with ligature support at the Powerline Git Repo.
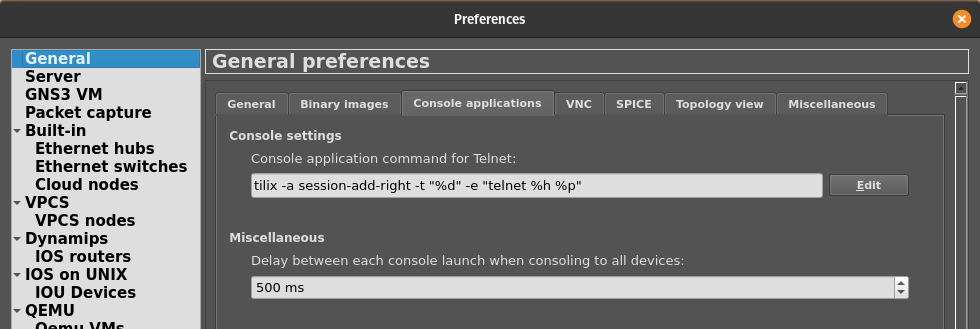
 GNS3 allows you to set the terminal application it uses under edit > preferences. The drop-down for console sets GNS3 to work with some of the most common applications, such as gnome-terminal or PuTTY. Tilix isn’t defined, but it works really well in this scenario because GNS3 users typically have several terminal sessions on-going and need to easily move between them.
To configure GNS3 to work with Tilix, choose “custom” and edit. Here’s the command that is needed:
tilix -a session-add-right -t "%d" -e "telnet %h %p"
This setup uses Tilix and opens new terminals to the right of the existing one. Other options set the title and tell Tilix how to connect to the GNS3 device. The variables are defined in GNS3 and are visible in the edit screen - %d is the tile, %h is the IP and %p is the port. Tilix has a man page if you want to investigate other options.